


Saturday, December 31, 2011
Friday, December 30, 2011
Ohhh darlin', don't you ever grow up ♥


just stay this little ♥


I never want to forget days like these. ♥
Thursday, December 29, 2011

Wednesday, December 28, 2011
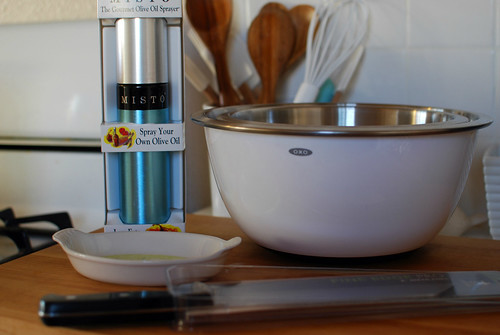
Stainless + White = Mixing Bowl Love.
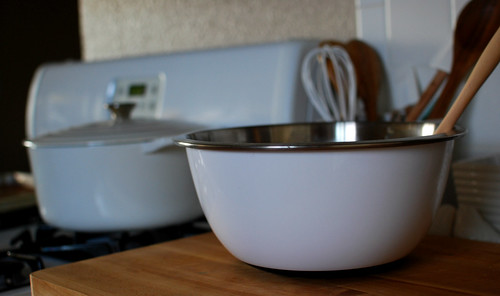
sweet little bowl of perfect! I love them so much, & they have special non slip grips on the bottom so they don't move around on the counter when you are mixing! ♥
Tuesday, December 27, 2011


Monday, December 26, 2011
Cupboard Switcheroos.
Well, there's things that are supposed to 'make sense' so...you naturally do them. Then you realize they just don't function for you and you have to change them. Today, I had to face it...and do some rearranging!
Naturally, I put our cups & glassware...by the sink, in a small cabinet. But, the cabinet was overflowing, while my mixing bowl, etc cupboard had extra space. So. I made the switch.
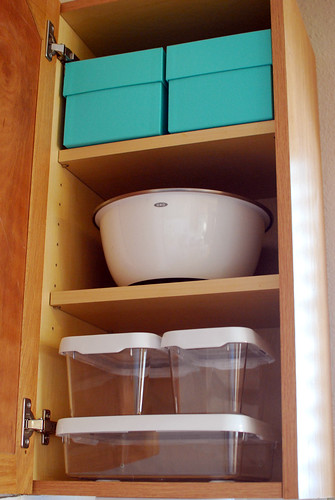
This cupboard stays organized, mainly thanks to OXO, my mixing bowls stack easily and don't take up very much space, same for their tupperware, our old tupperware--glad it's gone, is all I will say. Lol. Then up top, why Tiffany boxes? They make an amazing contraption of foam inserts for their wine glasses, that are keeping my pretty special occasion Tiffany wine glasses safely!
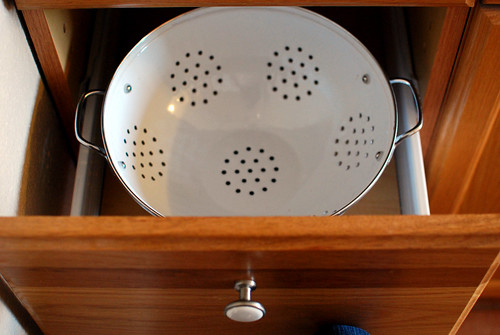
And. A strainer in a drawer. Because I'm short, is basically the explanation of that lol. I had it on our top shelf...but I couldn't reach it, and it wasn't working, lol. So into my drawer it went.
Naturally, I put our cups & glassware...by the sink, in a small cabinet. But, the cabinet was overflowing, while my mixing bowl, etc cupboard had extra space. So. I made the switch.
This cupboard stays organized, mainly thanks to OXO, my mixing bowls stack easily and don't take up very much space, same for their tupperware, our old tupperware--glad it's gone, is all I will say. Lol. Then up top, why Tiffany boxes? They make an amazing contraption of foam inserts for their wine glasses, that are keeping my pretty special occasion Tiffany wine glasses safely!
And. A strainer in a drawer. Because I'm short, is basically the explanation of that lol. I had it on our top shelf...but I couldn't reach it, and it wasn't working, lol. So into my drawer it went.
Sunday, December 25, 2011
Merry Christmas! :)

I took way too many pictures, end of story. Lol! We had such a great day, hope everyone else did too! ♥
Saturday, December 24, 2011
All is Calm All is Bright ♥
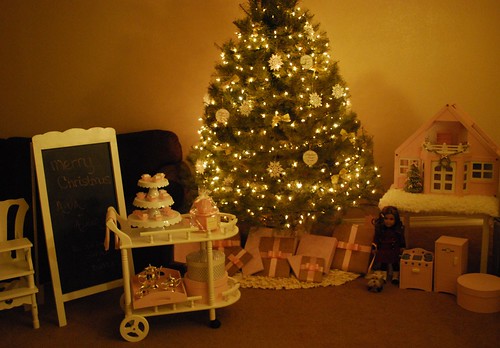
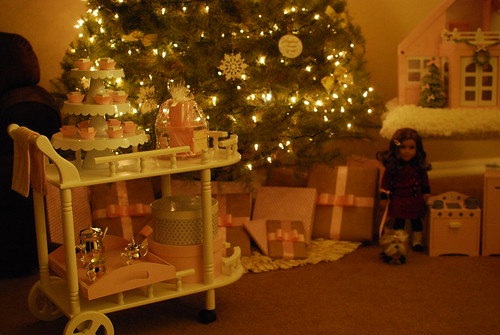
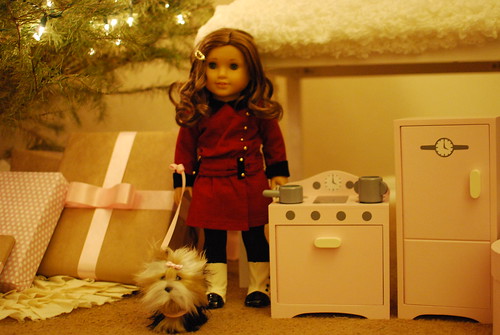
Our Pink Christmas ♥
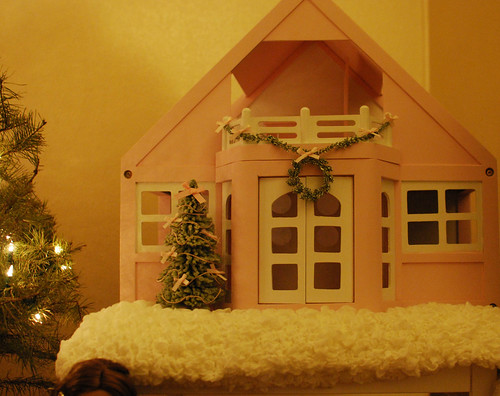
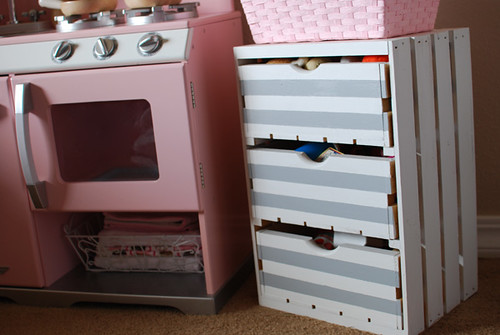
had to dress up the dollyhouse too!
It is so nice to see all our completed projects together--and ready to be played with! Feeling quite proud of us! :)

& just when I thought my pink christmas was complete...the hubby surprised me and asked if I had some room for some blue too :) ♥ and pulled this beauty out from behind his back.
Thanking god for blessing my family, we have so much to be thankful for. Merry Christmas everyone! ♥
Friday, December 23, 2011
Tamales & a thank you! ♥
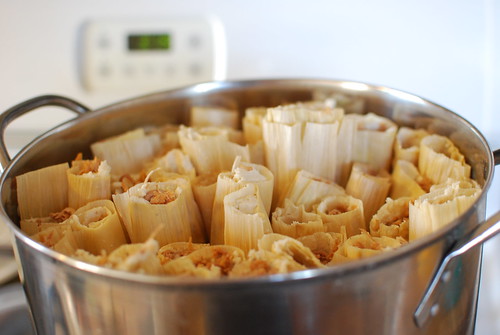
5 dozen tamales steaming & prepping some more to go in next! But before that I just wanted to write a quick thank you to you all!
I snapped a quick pic of the goodies I received today, that I'll be reviewing on a sponsor site later on, but I'm sure you guys will hear more about them soon, I can't wait to try them! From what I see...I can already tell this stuff is going to be amazing! & it's been stuff I've been wanting to try for quite awhile, so I'm really looking forward to it!
Who would've thought taking pictures of my precious girlies & yummy food--would open up such great opportunities?! It's been quite the blessing this past year to do what I love...and get some great things in return for doing so! So thanks to all of you who have followed along! I really appreciate it & all the kinds words I've received from my followers & sponsors too.
Here's to another great year--thanks everyone! ♥
Thursday, December 22, 2011
Wednesday, December 21, 2011

Tuesday, December 20, 2011
Monday, December 19, 2011
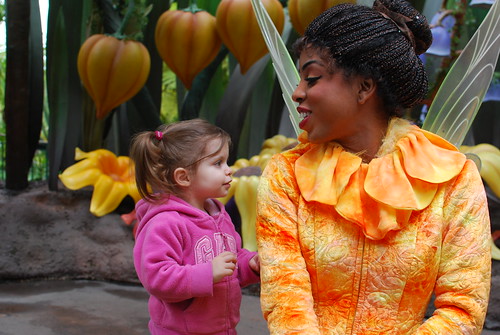
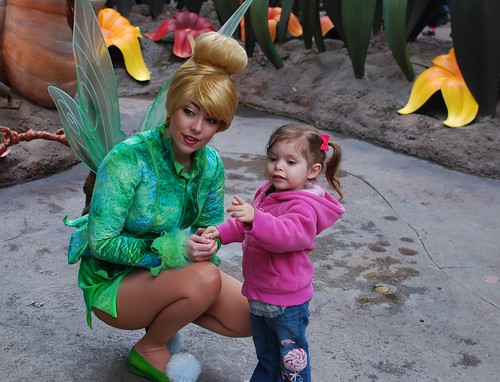
Disney Overload!

Mommy & Lex!

Our little fam!
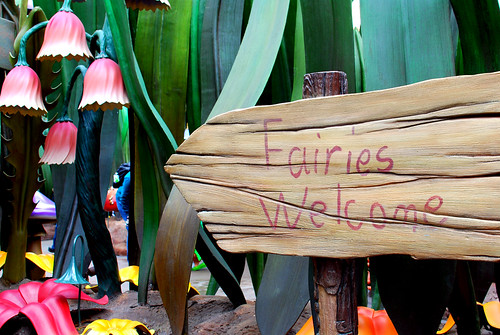
Pixie Hollow ♥
Scoping out Iridessa's wings! :)
"I like your flowers Tink!"
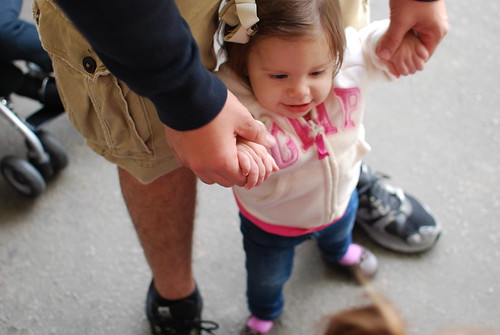

Being silly in line!

Doll. face. ♥

Mickey beignets & hot cocoa!
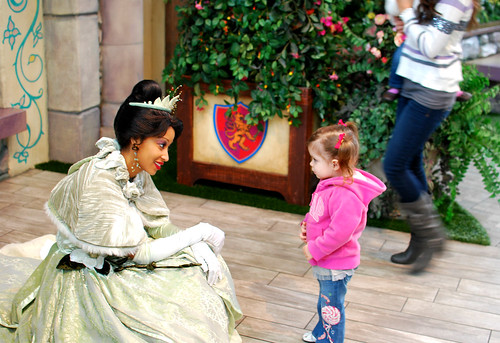
Tiana!

Ariel!

Belle!

1 sleepy princess.

& 2 sleepy princesses. ♥
Sunday, December 18, 2011
Our DIY Scalloped Chalkboard Easel ♥

Cannot wait to see it sitting in front of the Christmas tree!
The hubby & I love working together on projects around the house, we have sanded, refinished, repainted plenty. But this here...is a first! This is the first thing that has been truly BUILT in our home...and I could not be more proud! This project cost us just $30! Our inspiration came from Restoration Hardware Baby & Child. Their version is gorgeous, I wanted it. Okay so I NEEDED it. But, I didn't think the distressed look would work for us...and I also didn't care much for the price tag. So. There began our project.
I will have more on it later, but for now I'm going to go relax with my fam! The hubby has off ALL this week & we leave for our Disney trip bright and early tomorrow, we're going to need our rest! ♥ have a good week everyone!
Saturday, December 17, 2011
projects. projects. projects.
This weekend we are finishing up the last of our Christmas projects!! & These little blocks are one of the last things on my 'to do' list!

Friday, December 16, 2011
anddddd that's a wrap!
what I think should be the last of the Christmas gifts came rolling in today! & brought a sigh of relief to my anxious self :)

& it's Friday. ♥
& it's Friday. ♥
Thursday, December 15, 2011
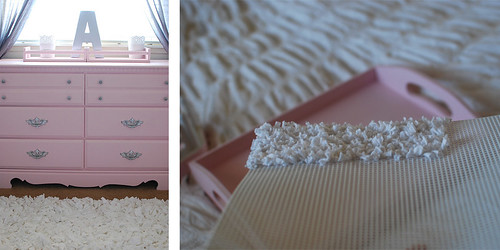
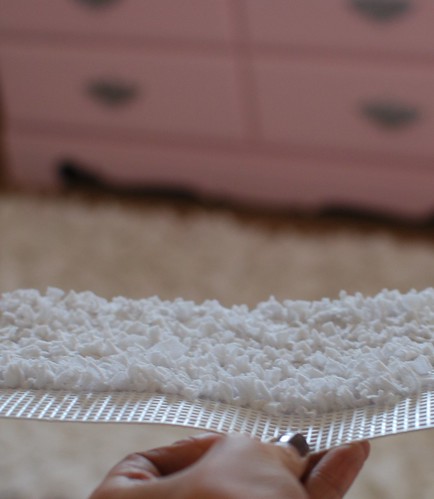
DIY T-Shirt Shag Rug Tutorial! Dollhouse Edition :)
As some of you know, I am working on a dollhouse for the girls. This means creating lots of 'mini' versions of their things, like this rug I mentioned before. After posting I received some questions asking how I went about doing it. So, I figured it would be easiest to just share here!!
Materials Needed:
-T-shirt in whatever color you choose! (I used almost all of a men's size large shirt)
-Plastic canvas
-Scissors
-TIME & Patience. ;)
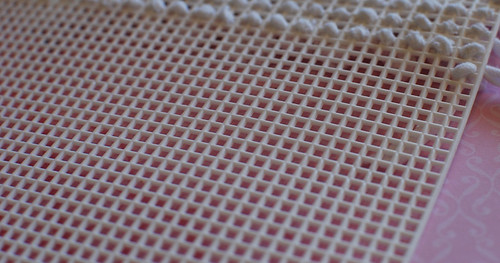
you might be wondering what plastic canvas is...this is what it looks like!
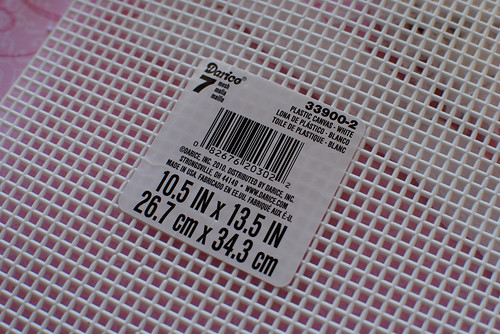
I found in at my local craft store for all of 30 cents! It was near the crocheting supplies & about the size of a piece of paper.
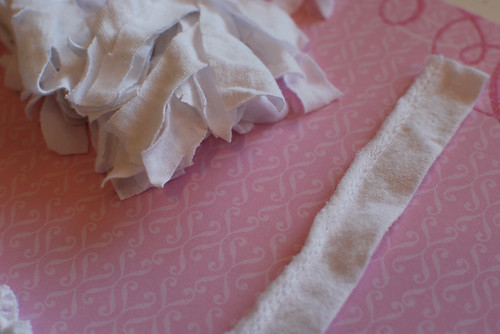
First, begin cutting your t-shirt into strips, approximately 1/2 inch thick...and somewhere around 3 inches long. I will just forewarn you, you are going to need way more strips than you think you will, so cut plenty, lol. I just tossed out the portion of the shirt with the seams, since they are thicker.
Once you have your strips cut you can go ahead and get started. All your going to do is knot each strip of fabric along the canvas. Like this...
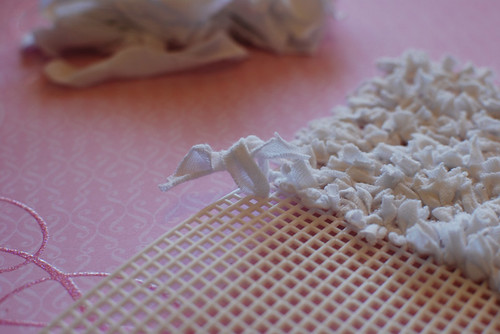
it might help more to see it from the other side. For each little square of the grid, I took the strip of fabric in through the bottom left hand corner and up through the right top hand corner. Now, if you're having trouble getting the strip through, you can try using something like a toothpick, cuticle pusher....etc, to help 'poke' the fabric through. You'll notice on the edges, I tied some the opposite way...this was simply so that it didn't look 'bare' on that first grid. Then I switched after that.
after you knot it...you'll notice the strips seem long
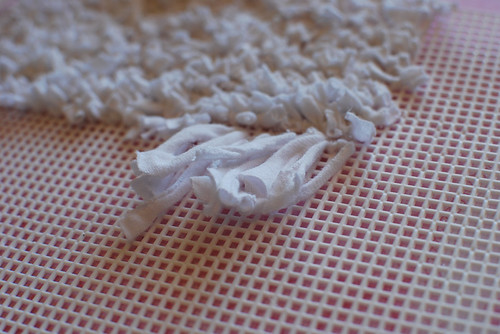
it's okay, just cut them! I normally do about a row...and then go back and cut them. You could cut them shorter to begin with...to avoid this, but I know for me, having the strips a little longer, made it easier to knot them, so I took the extra step, left them longer...and cut them after.
I like to be on the safe side and make sure I don't cut them TOO short. So I do a quick cut first, then go back and even out a bit. Remember that texture is okay for this rug, so they don't have to be perfectly even.
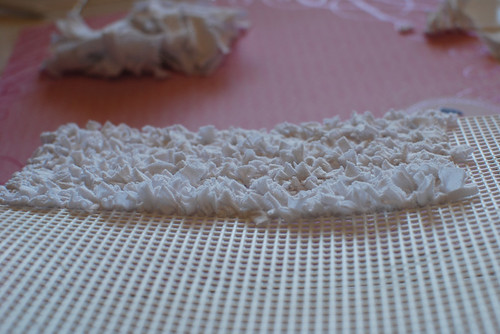
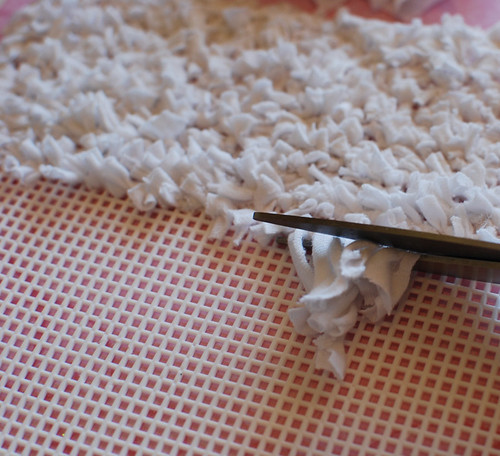
then...just continue knotting until you have the size you would like!
then, right after this, I just simply trimmed the canvas down to the correct size!
That's basically it! :) You're done! You might notice some spots as you finish that seem a little bare, if so, just go ahead and add an extra knot in that area to patch them up until it is as full as you'd like!
You can also use the general idea of this for a full size rug, you'll just have to cut your t-shirt into larger strips and use a rug canvas instead!
Hope this helps! Let me know if you have any questions! ♥
Materials Needed:
-T-shirt in whatever color you choose! (I used almost all of a men's size large shirt)
-Plastic canvas
-Scissors
-TIME & Patience. ;)
you might be wondering what plastic canvas is...this is what it looks like!
I found in at my local craft store for all of 30 cents! It was near the crocheting supplies & about the size of a piece of paper.
First, begin cutting your t-shirt into strips, approximately 1/2 inch thick...and somewhere around 3 inches long. I will just forewarn you, you are going to need way more strips than you think you will, so cut plenty, lol. I just tossed out the portion of the shirt with the seams, since they are thicker.
Once you have your strips cut you can go ahead and get started. All your going to do is knot each strip of fabric along the canvas. Like this...
it might help more to see it from the other side. For each little square of the grid, I took the strip of fabric in through the bottom left hand corner and up through the right top hand corner. Now, if you're having trouble getting the strip through, you can try using something like a toothpick, cuticle pusher....etc, to help 'poke' the fabric through. You'll notice on the edges, I tied some the opposite way...this was simply so that it didn't look 'bare' on that first grid. Then I switched after that.
after you knot it...you'll notice the strips seem long
it's okay, just cut them! I normally do about a row...and then go back and cut them. You could cut them shorter to begin with...to avoid this, but I know for me, having the strips a little longer, made it easier to knot them, so I took the extra step, left them longer...and cut them after.
I like to be on the safe side and make sure I don't cut them TOO short. So I do a quick cut first, then go back and even out a bit. Remember that texture is okay for this rug, so they don't have to be perfectly even.
then...just continue knotting until you have the size you would like!
then, right after this, I just simply trimmed the canvas down to the correct size!
That's basically it! :) You're done! You might notice some spots as you finish that seem a little bare, if so, just go ahead and add an extra knot in that area to patch them up until it is as full as you'd like!
You can also use the general idea of this for a full size rug, you'll just have to cut your t-shirt into larger strips and use a rug canvas instead!
Hope this helps! Let me know if you have any questions! ♥
Wednesday, December 14, 2011
Feeling the Disney love! ♥
First off... Congratulations, Karra! You won the lunch punch giveaway! :) I'll be contacting you to get them to you, & thanks to everyone for entering! I'll have some more giveaways coming up soon!! ♥
and next, my proudest couponing moment yet--Disney tickets! Not one, but 3! For not even the price of one ;) Thankful that Disney was doing some awesome deals on base for military members!!! & perfect timing for Christmas! Looks like this fam will be making a trip back to Disney, three times this year! So exciteddd! (& oh yes I did block out my barcode with some gingerbread men, lol, you never know what people will pull on the internet these days).

and next, my proudest couponing moment yet--Disney tickets! Not one, but 3! For not even the price of one ;) Thankful that Disney was doing some awesome deals on base for military members!!! & perfect timing for Christmas! Looks like this fam will be making a trip back to Disney, three times this year! So exciteddd! (& oh yes I did block out my barcode with some gingerbread men, lol, you never know what people will pull on the internet these days).
Subscribe to:
Posts (Atom)